Posts

Showing posts from 2012

Shrimp Fried Rice

Image
This is the recipe we use to make shrimp fried rice at home.  The best part of the whole recipe is that it contains no msg.  To make the recipe more healthy, you could substitute the white rice for brown rice if desired. Ingredients: 2 eggs, scrambled 1 shallot, chopped finely 1 medium onion, chopped finely 2 stalks of green onions, chopped 1 teaspoon of minced garlic 1 pound of shrimp, peeled and deveined 1 cup of carrots, chopped 1 cup of peas 4 cups of cooked rice (use day old cold cooked rice for best results) 1/2 cup of soy sauce salt and black pepper to taste Scramble two eggs in a skillet and set aside for later. Chop the shallot, onion,  and green onion and throw in a pan.  Add the minced garlic and brown.  If the seasonings start to stick to the bottom of the pan, use a bit of water, about a half a cup, to deglaze the pan. Add in the shrimp and let cook until the shrimp is thoroughly cooked. Then, add in the carrots and peas, stirring occa

Baked Tilapia

Image
Baked tilapia is a staple around our house.  It is a quick and easy weeknight meal and it is quite tasty.  I usually serve it with potatoes or rice pilaf.  It's also great with green beans. Ingredients: Paprika Parsley Salt Black pepper Oregano Thyme Lemon juice Butter (a 1/2 teaspoon for each piece of fish) You can use fresh or frozen tilapia for this recipe.  If using frozen, allow the tilapia to thaw. Sprinkle on the paprika, parsley, salt, black pepper, oregano and thyme on the fish.  Then pour on a little lemon juice, just a few drops on each fillet. Put a half teaspoon of butter on top of each piece of fish.  Bake the fish in the oven at 350 degrees for 25 - 30 minutes. 

JalapeƱo Turkey Burgers

Image
We had these awesome jalapeƱo hamburgers once at a family member's house.  I am not quite sure of the brand, but they tasted great.  After that, I started wondering how I could do this at home.  Since I normally make my burgers with ground turkey, I thought, I will have to see how these jalapeƱo turkey burgers turn out. The picture above illustrates how the burgers look when finished.  Don't mind the massive piece of lettuce on this burger, the bottom of the bun is actually underneath it. Ingredients: 1 lb. ground turkey 1 jalapeƱo pepper, finely diced Paprika to taste Salt to taste Dice the jalapeƱo as small as possible.  You want it to be fine so you don't bite into a huge chunk of jalapeƱo pepper once mixed into the burger patties.  However, if you would prefer bigger pieces, feel free to chop it differently, according to your tastes. Discard the seeds of the pepper. In a bowl, add the ground turkey, jalapeƱo pepper, paprika and salt.  I did not a

Making Patio Pavers

Image
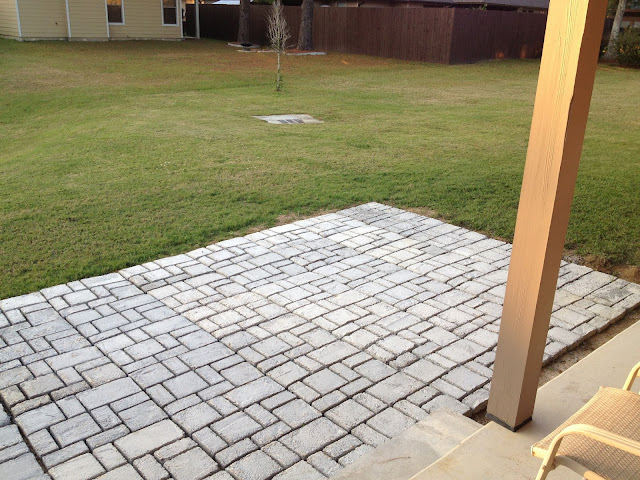
Here is what our patio looked like when we started after prepping the ground .  It was still a work in progress.   We decided to make pavers for the patio using a mold.  This is a mold made by Pathmate in the Belgian style.  This seemed to be the simplest method for creating the patio.  By using the mold we saved money on the purchase of individual pavers, and saved time because we did not have to design and layout a pattern.  To use the mold, we simply mixed concrete and poured it into the form.  Smooth off the top of the mold.  We allowed the concrete to set for a couple of minutes.  Then, gently we removed the mold. This is how it looked when the mold was filled with concrete. After letting it sit, we lifted the mold. You can move on to the next mold setting immediately after lifting out the mold. This is how the pavers looked as we moved along. This project obviously took several days to complete.  We discovered this would have worked out better if we had d

Prepping for a Patio

Image
This is one of the major projects we have been working on the past few weeks.  Since moving into our house, we have discussed this patio.  We have spent a great deal of time planning the entire outdoor living space.  This space will be done in stages.   The first stage is laying a patio with pavers.  The second stage will consist of us building an overhead cover.  We are still working out the design elements and a plan of execution for that stage.  The third and final stage will be to build an outdoor kitchen area.  Because there is a pond behind our house, we would like to create a place where we can not only barbecue, but also clean and cook any fish we catch.  About a month ago we finally began working on phase one of the backyard, the patio.  The hardest part of this project is leveling the ground.  The first thing we did was mark the area with stakes. Then, we had to dig up the sod.  At first, Mr. C thought he could get the sod up by shoveling.  He was right, you can, it just take

Converting Dress Pants to Maternity Pants

Image
I have been having a difficult time finding maternity dress pants.  I would like to not pay a fortune for them.  Additionally, I was already an in between size before pregnancy.  Plus size close are usually too big, but some of the misses clothes were too tight and ill fitting.  I am also short, so finding dress pants that fit well and that do not requeire hemming is also a challenge.    I bought these pants from New York and Company about two years ago.  I wore them three times before the zipper broke.  I was pretty disappointed because I loved the way these pants fit.  I considered bringing them to a tailor, and put them off to the side to do so.  However, as with a few other pieces I have in need of altering, I forgot about them.  Now, I am glad I never brought them to the tailor because I decided to turn them into maternity pants.   The key to turning regular pants into maternity pants is to make sure they fit you through the hips and legs.  The first step is to remove t