Posts

Showing posts from March, 2012

Wedding Idea: Wedding Banner

Image
We wanted to personalize our wedding as much as possible. In an attempt to do so, we created a wedding banner to be hung from the interior balcony in our reception space. I had seen other brides create banners on The Knot, it looked fairly easy to replicate. For the project, we used a yard of satin fabric, acrylic paint in whatever colors desired, a thin rod from Lowe's, rope (to hang the banner) and thick satin bias tape. First, upload your graphic for the banner, we used our monogram, to the Block Posters website ( www.blockposters.com ). This is a free website that will tile print your design based on dimensions you provide. Once your tile print has been generated, you can print the pages from the PDF file provided. Tape the pages together to create a template, this part is kind of similar to a puzzle. Place the template underneath the satin (right side of the fabric should be facing up). Use a pencil to trace the design onto the satin fabric. Once you

Wedding Idea: Unity Candle

Image
I purchased a unity candle set from Hobby Lobby. It was plain and had no writing or designs on it. The set included one thick cream colored candle and two thinner candles. I also used a sheet of 8 1/2 x 11 vellum scrapbook paper. On the paper, I printed a verse used during our wedding ceremony and our wedding monogram. Once printed, I trimmed an inch from the top and bottom of the vellum paper . I wrapped the paper around the thick candle to measure the size needed. You only want about a half inch overlap of the paper at the back of the candle. Once this has been determined, trim the paper to size. Now, using hot glue, adhere one edge of the paper to the back of the candle. Wrap the paper all the way around the candle and glue the other edge to the existing piece of vellum that has already been glued to the candle. To cover the seams (where the paper and candle meet near the top and bottom of the candle), simply glue a piece of 1/4 inch organza ribbon over t

Wedding Idea: Ring Bearer Pillow & Flower Girl Basket

Image
Ring Bearer Pillow To make the pillow, I took a piece of satin, folded it with right sides together and cut out two 12 x 12 squares.  Sew three of the four sides of the squares together.  On the fourth side, sew a third of the way from the left, then sew a third of the way from the right corner.  This should leave you with about a third of the length open in the middle.  Flip the pillow inside out, so the right sides are now out.  Use batting to stuff the pillow.  Once you have achieved the desired "puffiness", as I like to call it, of the pillow.  Hand stitch the open edge close.  You will have to fold in the raw edges in a little as you stitch so they are not exposed. Wrap a piece of 1 1/2 inch thick ribbon around the center of the pillow.  To secure it, tack the ends down by stitching the ribbon to the front center of the pillow.  The ends should overlap a little in the front.  For the bow.  Take another piece of that same ribbon, fold the ends back (there will be a l

Wedding Idea: Wooden Letters

Image
It is popular to use wood to emphasize certain wedding related phrases.  Some brides choose to use this type of decor to dress up guest tables, cake tables, gift tables or even food tables.  For our wedding, we used the letters for the cake table. This is one of the easiest projects to do.  I purchased unfinished wooden letters from Hobby Lobby.  I also bought some acrylic paint in a color we used for our wedding.  In case you haven't already figured out, Hobby Lobby became my favorite store when we were preparing for our wedding.  Source:  Hobby Lobby Just paint both sides of the letters with acrylic paint and that is all there is to it.  No really, it's that simple.

Wedding Idea: Personalizing Canvas Tote Bags

Image
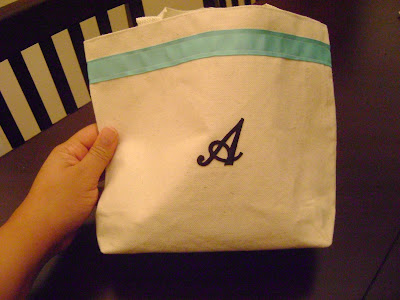
Wedding season has begun.  We did a lot of projects for our wedding nearly two years ago.  This week, I will share with you tutorials for some of those projects. The first project is a canvas mini personalized tote bag.  I put all of the gifts for my ladies in these bags.  I liked these because they can be reused.  I purchased these bags,  individual iron on letters and one inch wide grosgrain ribbon from Hobby Lobby. Source: Hobby Lobby Source: Hobby Lobby First, I sewed the ribbon around the top of the bag.  It was positioned about an inch from the top of the bag.  I also used a natural colored thread to match the bag and provide a little contrast on the ribbon.  Sew all the way around at the top edge of the ribbon and do the same around the bottom edge.  You want the thread to show a little. Center the iron on letter on the bag.  Place a thin piece of cloth over the carefully positioned iron on letter to provide a barrier from the direct heat of the iron.  Iron over t

Hanging Hampers

Image
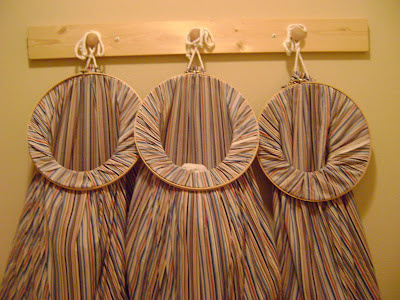
Happy Friday!  This post will be quick and easy.  I saw this idea on Savvy Brown's blog.  It can be found here .  It works well for organizing laundry.  Instead of using pillow cases, I made my own bags.  They are about the same size as a standard pillow case.  I sewed three sides together (the two long sides and on short side of the rectangular pieces of fabric).  Then I just created a loop all the way around the open end of the sack large enough to thread the drawstring through. For the drawstring, I used a thick rope to give the bag something a little more durable from which to hang.  I made three of these bags, because we like to sort our laundry, and hung them from a scrap piece of wood I had left over from another project.  I added unfinished wooden knobs to the piece of wood to serve as hooks.  The piece is screwed into the studs in the wall.  Each bag is tied around a knob. Once assembled around the embroidery hoop, and hung, the drawstring will cause the bag to clos

Classic White Icing

Image
This is the recipe I use for my classic white icing.  It is not super sweet, the salt cuts down on the sweetness.  It contains Karo syrup which helps to make it smooth and creamy. Ingredients: 2 softened sticks of unsalted butter 3 cups of powdered sugar 1/4 teaspoon of salt 1 tablespoon of vanilla extract (I use my homemade recipe) 1/4 cup of milk 1 tablespoon of light Karo syrup Using a mixer, first cream the softened butter in a bowl.  Add in powdered sugar and continue to mix. Then add in vanilla, salt and milk and mix until all ingredients are well mixed and your icing is a smooth consistency. This icing is great for cupcakes, but I also used it for the "B" cake I made, found here .

The Beauty of Aloe Vera

Image
There are many natural gifts that exist around us.  If we pay attention to what Mother Earth has to offer, we might be surprised.  Once I owned an aloe vera plant.  My mother had given it to me and I was actually able to keep it alive for quite some time.  It only died when we moved, I guess I failed to care for it properly.  I'm quite positive that is the reason for its demise. When I had the aloe vera plant, I would break a little off to retrieve the gel from within when I had a cut.  It is quite effective in healing cuts and scrapes.  It can also be used for healing scars and moisturizing dry skin. I recently discovered its benefits for hair.  For the past three years, I have had a major problem with dry scalp and flaking.  I started doing a pre-treat on my hair prior to washing it.  I make several parts and apply the aloe vera gel to my scalp.  I leave it on my hair for a few hours and then wash my hair.  Since doing this, I have noticed a dramatic decrease in the amount

Catfish Stew

Image
I come from a family of people who love to fish. This recipe has been in my family for quite some time. I have modified the recipe over time adding stewed tomatoes to the mix. It seems to add a little extra kick to the dish. 2 lbs. catfish fillets 1 medium onion 1 bell pepper 1 clove of garlic (minced) salt to taste pepper to taste cayenne pepper 1 can stewed tomatoes 3 small cans tomato sauce Saute the onion, bell pepper and garlic on medium high until soft and translucent. Then add in the catfish fillets and season with salt, black pepper and cayenne pepper. Let the catfish cook down in the seasonings. Add in the stewed tomatoes and tomato sauce. Let cook for a about ten minutes, stirring to keep the fish from sticking to the bottom of the pan. Serve the fish stew over rice.

Shape Cakes Without Special Pans

Image
Making cakes with shapes is not as hard as it may seem.  There are pans out there for all kinds of cakes, but you can make your own template. Draw your desired shape on the parchment paper.  With kitchen scissors, cut out the shape.  This will be your template.  Secure the template to your cake with toothpicks. Once your template is in place, use the serrated knife to gently cut away the parts of the cake that extend beyond the template.  I usually do this in sections, squaring off my cuts with the edge of the cake.  This helps me cut more accurately. If you have a shape, such as the "B" I am working on here, that has sections from the middle of the cake that need to be cut out, simply cut them.  Then, dig out the chunk from the middle section.  You may want to use a spoon to scoop out any left over crumbs. This is what it looks like once all parts have been discarded. Once all parts around the template have been cut out, carefully remove the template from t

I Love You Because...

Image
This is another Pinterest find.  I saw several of these frames that say, "I love you because..."  This one was my favorite from A Content Housewife's blog. I thought this would be a great way for me and Mr. C to communicate since we usually see each other in passing.  He came up with the idea that the frame should show up in a random place each time, so it is a surprise.  I think this is a great way to show appreciation for your family members, it is especially good for couples.  Here is my version of the frame, with a lovely message from the husband.  All I did was print the words on a piece of scrapbook paper from Hobby Lobby and put it into an 8 x 10 frame.  I chose not to add the rossette detailing as done in the original. I certainly appreciate knowing he recognizes my efforts.  This is a great simple, but meaningful project.

DIY Cake Plate

Image
I found this idea on Pinterest first, it was a pin from The Happy Housewife's blog.  It can be found here . I made my own version using some beautiful ceramic plates I found at Hobby Lobby.  First, I started with a glass candlestick holder. Spray paint the candlestick holder black.  Then instead of hot glue, I used epoxy in a syringe as the bonding agent.  To use the syringe, you have to squeeze a bit of the of both substances and mix them together.  I use a toothpick to apply the mixture to the top of of the painted candlestick holder.  Then press the candlestick holder to the bottom of the ceramic plate and hold for about a minute. Leave the plate upside down, it takes about a day for the epoxy to cure completely.  Once it cures, the cake plate is done.  These are great for sweets like cookies, cupcakes and petits fours.

The Best Chocolate Chip Cookies EVER

Image
I love making these cookies!  They are everything a cookie should be, soft and chewy and full of chocolate morsels.  This recipe is based on Martha's recipe for soft and chewy chocolate chip cookies.  I use the same ingredients, but prefer to mix them a little differently than her method, the cookies still come out the same. Ingredients: 2 1/4 cups all purpose flour 1/2 teaspoon baking soda 1 cup unsalted butter (softened and at room temperature) 1/2 cup sugar 1 cup light brown sugar (packed) 1 teaspoon salt 2 teaspoons pure vanilla extract 2 large eggs 2 cups of semisweet mini chocolate chip morsels Preheat oven to 350 degrees.  Combine flour, baking soda, butter and sugars in a bowl and stir.  Then add salt, vanilla extract and eggs and stir until all ingredients are well mixed.  Finally, add in the chocolate chips and fold them into the mixture. At this moment the dough will be perfect if you would like to eat it raw.  I usually set a little dough aside just

Reversible Head Tie

Image
I love head ties, headbands, scarves!  I went through a phase in college where I wore one almost everyday.  Since joining the professional workforce, I have pulled back a little.  Mainly because the scarves and head ties don't always match with the style of my work clothes.  I still love them.  I started making them reversible so I would have more of a variety.   I use two complimentary fabrics.  Usually, I prefer to use a print and a solid.  First, cut two long strips long enough to go around your head and have a little to hang.  I make mine about two and a half inches wide.  Put right sides together.  With a sewing machine, sew edges of long sides together.  Flip the piece and do the same on the other longest side.  You don't have to use a sewing machine, but it is easier to use one.  However, all of this can also be done by hand. Once the sides have been done, flip the piece to the right side. Fold the ends to the inside of the piece and sew across on both end