Posts

Showing posts from April, 2012

Red Beans & Rice

Image
Red beans are a great meal you can prepare easily while at work.  All you need is a slow cooker and a few ingredients.  If you can get your hands on some Camellia red beans, they are the best. Ingredients: 1 lb. of dry kidney beans 1 onion 2 stalks of celery cayenne pepper garlic powder salt and pepper to taste 8 cups of water First, start with dry red beans. Soak the beans in water overnight.  Drain the water out and pour the beans into the slow cooker. Chop the onion and celery and pour it over the beans.  Then season with cayenne pepper, garlic powder, salt and pepper. Cut the sausage into pieces.  Add it to the dish. Finally, add the water and turn the slow cooker on high.  Let cook for eight hours. Serve red beans over a bed of rice.

Tomato Growing

Image
I am working on growing tomatoes.  We don't need a lot, so I started a couple of tomato plants in a medium sized pot.  There are a large variety of tomato plants out there.  I chose the Early Girl tomato. It is round in size, described as a globe type.  One of my favorite features is that it is considered an early and late bloomer.  I believe from the information I have read on it, that it happens to be one of the tomato varieties that blooms the longest. This is a picture of my first tomato blooming.  I do not have much success with gardening, but am actively trying to get better.  I will update you on the progress of my Early Girls later. In other gardening news, the Dwarf Meyer Lemon Tree still has green buds on the tree.  None of them have turned yellow yet.  I am considering adding some type of fertilizer to the soil, that might help them progress.

Baked Pork Chops

Image
This is our go to recipe for baked pork chops.  It is quick and easy, perfect dinner solution for a busy weeknight. To season the pork chops, sprinkle salt, black pepper, cayenne pepper, paprika, garlic powder, onion powder and parsley flakes on both sides of the pork chops and place them in a baking dish. Cook them in the oven on 350 degrees for 12 minutes.  Then flip each pork chop over and bake on the other side for another 12 minutes.

Adding a Concrete Step

Image
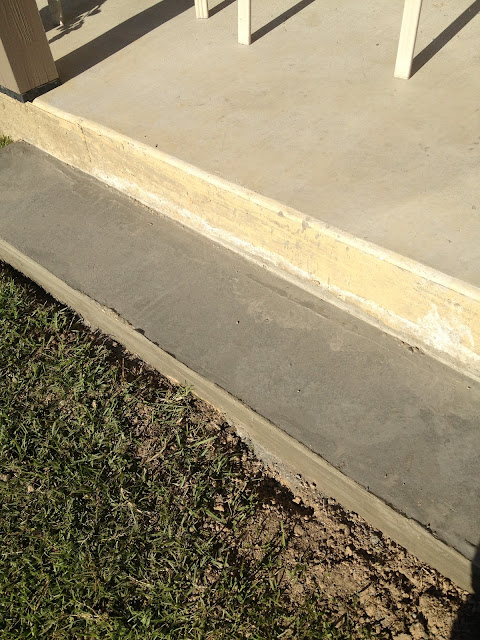
Mr. C decided to add a concrete step leading to our backyard.  Luckily, this past weekend our neighbors were gracious enough to help him do this.  It made pouring the heavy concrete into the form much easier for him.  We are so grateful for helpful and kind neighbors.  Our backyard is now on it's way to looking great! Off the back porch of our house, we had a twelve inch drop.  It proved to be a dangerous place for visitors, especially young children whose legs were not quite long enough to scale the drop off.  So, we decided to add step and only one was needed.  We decided to make that step 6 inches which would be half the distance of the drop. First, you have to build a frame.  We wanted our step to be 108 1/2" long and 12" wide.  We chose a width of 12" because that works best with our future plan for patio pavers.  Since the step is supposed to be 6" tall, we used a 2 x 6 to create the frame.  Our trusty friends at Home Depot cut the dimensions we ne

Wedding Idea: Coloring Books for Children

We had several children at our wedding.  We have large families with lots of children, so we invited them to the wedding.  To keep the little one's occupied, we made coloring books.  My aunts were gracious enough to put together the books.  They used a spiral spine for them.  All of those supplies can be purchased at an Office Depot. You can search the web for various pictures in black and white, like I did.  I simply pasted the graphics and enlarged them on the pages to create the coloring pages. I have heard of some brides using their own pictures and converting those to coloring pages with editing software.  I did not have the software to do that, nor did I know much about how to use it.  So, for this project, I kept it simple. A template for the book we used can be found here . Note:  I do not own, nor do I claim to own the rights to any of these images.  This was strictly for personal use and to entertain the little ones in our company for the wedding.  No profit was m

Biscuit Beignets

Image
Happy Monday!  Okay, so maybe it's not necessarily a "happy" Monday for you, but it's here.  Let's make the best of it.  What better way to make today great than starting it with beignets?  They are pieces of fried bread covered in powdered sugar and they are awesome. You can make them from scratch, but there is also an easier way to make them.  I learned this method at an after school program I attended in elementary school.  I'm not quite sure where the recipe originated, but I used to beg my mother to let me try it at home. Simply start with a can of refrigerated biscuits, powdered sugar and cooking oil. Cut the biscuits in half.  While you are doing that, begin heating the oil.  You can use a Fry Daddy, if you have one, otherwise, you can fry these in a pan.  Fill the pan or fryer with the appropriate amount of oil and allow it to heat. Drop the halves into the hot oil.  Allow to fry for about thirty seconds, then flip each piece over and fry th

Closet Revamp: Desk to Vanity

Image
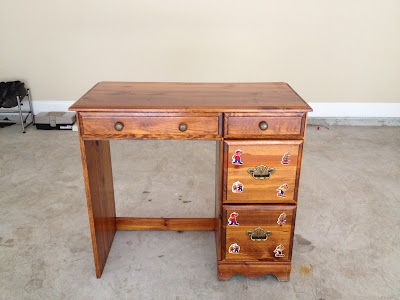
This is the first post in a new series I will feature.  In the Closet Revamp series I will be doing several projects to make my closet more functional.  Once all the projects are complete, I plan to do a reveal of how the finished closet looks. I have never been the type of woman who wanted a vanity at which I could do my makeup and hair.  It just was not something that entered my consciousness, until now.  Lately, I have noticed that while I am doing my hair, especially flat ironing it or setting it on rollers, there is a tinge in my lower back.  Maybe this is because I am standing at the mirror with arms stretched behind my head for an extended period of time, pulling and gliding tools and things throughout my hair.  Perhaps it is a tingling reminder that I could stand to lose a few pounds.  Either way, sitting would be a more comfortable position for me to do my hair. I began searching for a desk to refinish.  I wanted a desk because I plan to utilize the drawers.  When my dad f

Chicken Parmesan Casserole

Image
Chicken Parmesan is one of my favorite dishes.  This casserole is easy to make and is the first meal I cooked for my husband when we were dating.  He liked it then, and he still loves it now.  Every now and then I break this one out for him. Ingredients: 1 box of panko breadcrumbs 2 jars of marinara sauce 6 chicken breasts 1 large egg pasta (penne, bowtie or mostaccioli) 1/4 cup of butter Start by boiling the pasta.  While doing that begin pounding the chicken to thin the breasts.  You want to do this so they cook faster.   Then create an egg wash by cracking the egg into a bowl, and mixing it up.  In a separate bowl, put the panko bread crumbs.  Set aside. After all of the chicken breasts have been pounded, dip each in the egg wash, covering on both sides. Also, coat both sides in the panko breadcrumbs.  Then place in a buttered skillet and pan sear both sides.  Don't worry if the chicken does not cook all the way through at this point, you just want to l

Webbed Belts

Image
When I was a kid, I had several belts like this.  I liked them because they were completely adjustable and always fit perfectly.  This belt is not difficult to make.  I purchased some webbed ribbon and D rings.  The spool I bought was four feet in length.  I used the entire length to make this belt.  If you are smaller than me, you may want to cut it down a bit and use a lighter to gently burn the edges.  This picture shows the length of the piece of webbed ribbon. Please note, when burning the edges, you want the heat from the flame to burn the edges of the ribbon so it does not unravel.  The edges will get crisp.  You do not want the flame to touch the webbed ribbon.  Be careful doing this, you can start a fire.   An alternative to burning the end of the ribbon is to fold about a quarter inch over and stitch across to tack it down.  Either way will work well for this project. Once you have the desired length of the belt cut, slip one end of the ribbon through the D ring