Posts

Nursery Project: DIY Bow Holder

Image
Today, I'm going to show you one of the projects I completed for our daughter's nursery.  I'll share a few more nursery projects with you later.  This one is a bow holder I made for the nursery. Honestly, I took a gamble on the Little Miss.  When we found out she was a girl and we started putting together the nursery.  I just had a feeling she would have lots of hair and would need something to hold all of her bows.  The Little Mister was born with a lot of hair, and the same was true for Mr. C and I when we were babies.  How could she not have a head full of hair?  So I took a risk and made this bow hanger for her closet door before she was born.  This was one of those projects I knew I would eventually add to the blog. I used an unfinished wooden plaque, an unfinished chipboard letter (slightly smaller than the plaque), four strips of ribbon (cut a yard long each), two six inch long pieces of ribbon, two paint colors, a strip of Velcro,...

Hearty Chicken Soup

Image
I love soup!  Actually, I can and do eat it year round.  But, in the fall and winter, soup is a staple.  Chicken soup is absolutely one of my favorites.  Lately, I've been working on perfecting my own recipes.  Ingredients: 1 Rotisserie Chicken (like the kind found in grocery store delis), torn off the bone 3 Russett Potatoes, diced 1 Pound Carrots, diced 8 Ounces Creole Seasoning Blend (Usually includes onions, bell pepper, celery, green onions, parsley, garlic; I prefer Guidry's) 4 Stalks Celery, diced 3 Teaspoon (or 6 Cloves) Minced Garlic 14 Ounce Can Diced Tomatoes 10 Ounce Can of Rotel Tomatoes 3 Tablespoons Salt 1 Teaspoon Pepper 2 32 Ounce Chicken Broth 8 Cups Water 1 Pound Ditalini Pasta For the rotisserie chicken, my local grocery store sells one that is considered "naked".  It has skin on it, but it is not seasoned with any lemon pepper, creole or Italian seasonings.  As I tear it from the bone, I remo...

Three Strand Twist Out

Image
I discovered this style years ago when I saw the final results.  I've never been good at twistouts, but I have always liked them.  It took a while for me to grasp the concept of the three strand twist because naturally your brain wants to braid when you divide your hair into the three sections.  It's a funny thing how your brain works.  I have found that it takes concentration to make these three strand twists happen, but it's not hard. Here are two angles of how the style looks.  Don't mind my eucalyptus in the background.  I didn't realize it made it hard to see the style.  Now, I will say, one of the problems I always have with twistouts, is that my hair tends to unwind at the ends, no matter how tight I twist it.  Because of this, I actually roll my ends around a metal clip and close the clip to keep the twists in overnight.  Also, I take bobby pins and twist my hair tighter at the roots and secure it with pins to keep it from untwis...

Back Again!

Image
Happy New Year!  Look who's back...AGAIN!  When I disappear for long periods of time, you know it's usually due to something big.  Well, you are correct!  I've been away from the blog for a while because...(SURPRISE!) we had a baby.  Our beautiful Little Miss came into our lives in November 2017.  We're all ecstatic that she's here, including her big brother...the Little Mister. I plan to return to blogging in 2019 on a more regular basis, now that we are managing our "new normal".  I have plenty new projects to share with you.  I will be doing more crafting, sewing, and cooking.  I'll also share with you the birth stories of both of my children.  I'll share with you my adventures in breastfeeding, and I plan to even do a few product reviews relative to that.  I'll also share the pros and cons of our Ashley Wilcot sectional.  I have had plenty of interest since we brought it home in July 2015.  That piece of furnit...

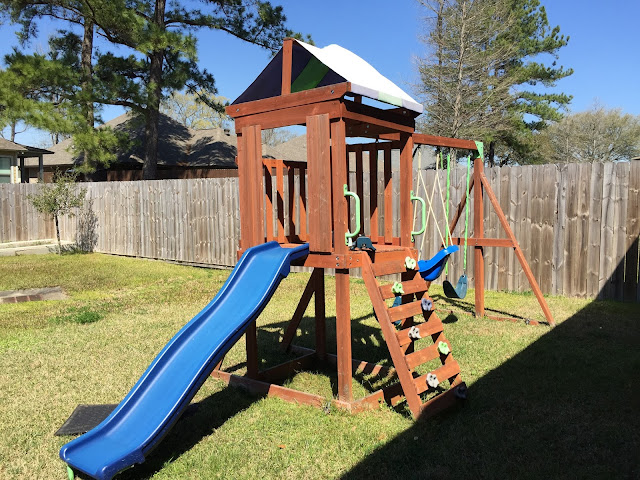
Rejuvenating the Play Set

Image
Our son, the Little Mister, has had this wooden play set for about three years now.  He loves it!  This Denver Wooden Swing Set was a gift from Santa his very first Christmas.  It sits in our backyard where there is sun beaming on it for most of the day.  Although it is still a rather new unit, it had started to fade pretty badly.  And, the fabric over the fort was torn at the top, from years of waving in the wind. We knew it needed a refresh.  So, we decided to stain it and change the fabric over the fort.  We were able to do everything in one weekend.  For this project, we enlisted the help of my brother and my husband's teenage cousin.  She did a perfect job getting into the hard to reach nooks and crannies we struggled to get to with our old backs and knees. The first step to this refresh was to remove the slide and swings from the unit.  We removed all the hardware from the wood, except the adjoining plates on the top corn...