Posts

Showing posts with the label Tutorials

"Disney Newbie" Shirt

Image
It's February!  Last February, we took the Little Mister to Walt Disney World for the first time.  We were going to be in Orlando for something else, so we decided to take a little time to bring him to Disney World.  It was the perfect opportunity because he got to go with his uncles, both of this grandmothers, one of his grandfathers...even his only living great-grandmother joined us.  What a blessing it was to be able to share his first Disney experience with all of those loved ones! We had a blast on the trip!  We only did one day at the park, but that was all we had time for.  It was a great introduction to theme parks for the little dude. Before going to the park, I decided to make a shirt that said "Disney Newbie".  I wanted the Little Mister to have a shirt to commemorate his first Disney Park experience.  I also wanted to make him a shirt that would be easily identifiable in the event he wandered off from us and got lost.  We ...

Mickey Mouse Buttercream Transfer Cake

Image
Remember when I did the LSU cake years ago?  The technique I used on that cake was called a buttercream transfer.  Well, I recently did another cake using that technique for the Little Mister's Mickey Mouse themed birthday party. I started with a picture of Mickey Mouse, taped down to the counter, with a piece of wax paper taped over it.  Using the appropriate colors for the character, I outlined the face with a size 5 Wilton tip in black buttercream icing.  I continued to fill in all the areas that required black.  To do this, I prefer to use a diagonal motion.  I don't know why, but it just worked for me. The Little Mister had fun watching me work on his cake.  I thought that was the sweetest thing.  That's something special about making his cakes, we get to share these special moments together. Once I completed filling in the face with all the colors, it was time to stick this in the freezer.   I actually flipped...

Additional Kitchen Storage

Image
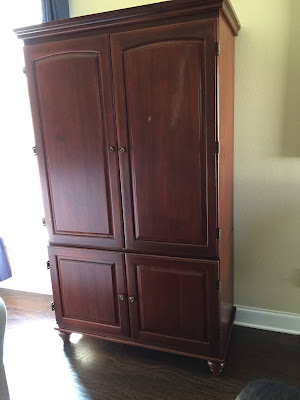
Our kitchen is a little small, and I need lots of kitchen storage.  So, I came up with a solution to my problem of not having enough space to put everything.  I came across this pretty armoire on Craigslist. The shape and size was perfect for what we needed.  It was simply the wrong color to match our kitchen cabinets and the other furniture in our living room area.  So, I knew I would have to stain it. Deciding what stain to use and how to use it was my first major hurdle.  I wondered if spray painting it was the best bet, given it would provide a similar look to our kitchen cabinets.  But, honestly, I could not really find too many examples online of spray painted wood in an espresso color or something of the like.  Most of the examples of spray painted wood pieces were of bright vibrant colors, none of which I wanted for our armoire. In my research, I came across the Young House Love post where they stained the cabinets in their kitchen ...

Fish Cake

Image
The Little Mister loves fish.  He likes to talk about the fish in the pond behind our house.  He likes to look at the fish in the tank at the store.  He just loves fish.  So much so that I decided to do a fish cake for him for his birthday. We don't often let Little Mister have sweets.  We are slowly easing him into the world of the sugar overload.  I'm not a sugar free zealot or anything, but we are trying to keep him from being heavily dependent on sugar.  Since he is not a regular cake eater, I decided to make his birthday cake as simple as possible.  I made a white cake with french vanilla icing.  I will share that icing recipe with you in a later post. This cake is only a 6 inch round cake.  One batch of the french vanilla icing recipe did the trick for the entire cake.  I mixed up four colors of icing for this cake.  After putting a layer of white icing between the layers of the cake, I pull out about a tablespoon ...

Nursery Project: Assembling the Ikea Henmes 3 Drawer Chest

Image
Have you ever heard people say that assembling Ikea furniture will test your relationship?  Well, I have, and that is certainly true.  Good news, we survived the test! We took pictures as we embarked on this adventure. This tutorial is meant to provide a visual supplement to the Ikea instructions. It in no way serves as a replacement for the actual instruction booklet that came with the product.  The instruction booklet has no verbal instructions, just illustrations, so you may find this helpful. The best thing to do when starting on a project like this is to lay out all of the pieces grouped together by likeness. This will help you count to verify you have all pieces necessary to put together the furniture, but also helps to identify the pieces in the instructions. Not all companies are kind enough to label the parts and pieces as they are labeled in the instructions.  The first step was to lay out all of the legs, known as pieces L1, L2, R1 and R2. Then s...