Posts

Showing posts from 2020

Poured Acrylic Canvas
Image
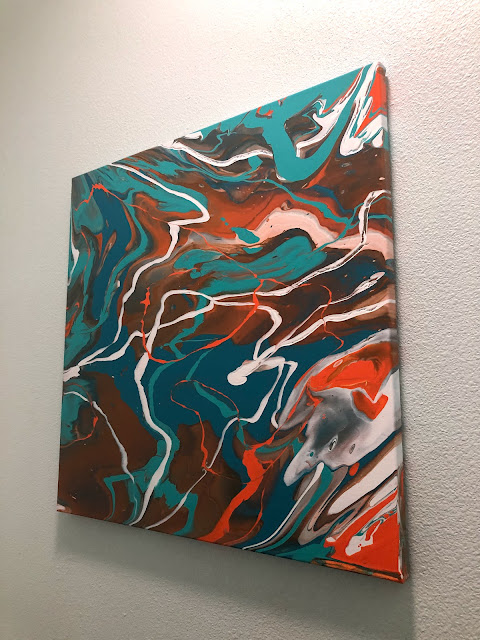
This is another one of our projects completed during the stay-at-home order. I had purchased the supplies back in January, thinking we would have gotten to this project on a weekend. Well, all the weekends passed and we never got to it. Being stuck at home provided the perfect opportunity to work on this fun little art project.  This is something we wanted to do and hang in the guest bathroom, once we completed the bathroom's facelift. We set up a drop cloth outside and got some fresh air while working on this canvas. This was a great art project to do with the Little Mister. We used the Color Pour Pre-Mixed Pouring Paints in the colors indigo, turquoise, orange, white and light blue.  Because we wanted to try to get a color between the turquoise and indigo, we mixed the two a little.  At random, we added the other colors into the cup a clear plastic party cup.  I let the Little Mister tell me what color he wanted to add next.  When we added the orange to the cup, it kind of create

Shrimp Remoulade

Image
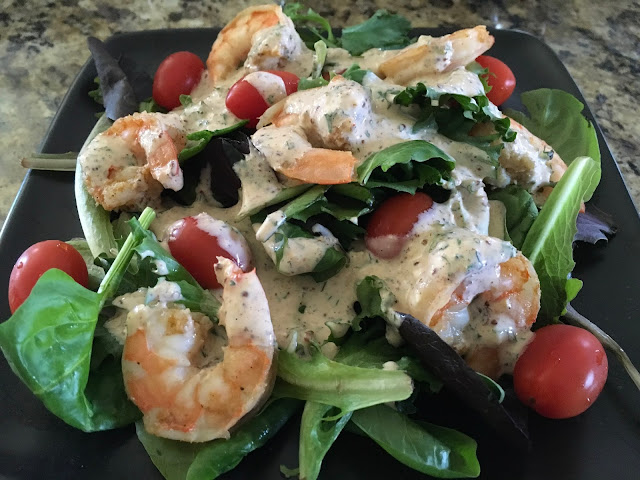
Last year, I started eating more and more shrimp remoulade salads.  They became a staple during the Lenten season.  After spending lots of money buying them multiple times a week, I decided to try my hand at making my own. Ingredients: For the Salad 16 - 20 count shrimp Crab boil (I use Louisiana brand) Spring salad mix Grape tomatoes For the Remoulade Sauce 1/2 cup mayonnaise 1/2 cup creole mustard (I use the Zatarain's brand) 1 tsp ketchup 1/2 cup distilled white vinegar 1/2 tsp cayenne pepper 1 tsp black pepper 1 tsp paprika 1/4 cup grated white onions 3 tbsp finely chopped fresh parsley 1/2 tsp minced garlic 1/2 tsp Worcestershire sauce 1 squeeze of juice from half a small lemon I boiled the shrimp in the crab boil until done.  After the shrimp boiled, I let them sit in the water for 5 minutes. This allows the seasoning to soak into the shrimp. To prepare the remoulade sauce, I started by mixing the mayonn

Mason Jar Door Hanger

Image
Here is another project I completed months ago, but never posted.  When we first moved here, I had a wreath on the door for every occasion.  I had kind of grown a little tired of my standard wreaths.  So, I had been looking for other options.  While walking through the store, looking for inspiration, I picked up a large black wooden mason jar door hanger and some burlap and lace ribbon.  I thought it could go around the neck of the mason jar.   The supplies purchased from Michael's When I got home with all my supplies, I thought of making a letter "C" using my Cricut.  The "C" was made in Design Space using the "Another Day in Paradise" font I found on Dafont.com.  I sized it to fit the body of the mason jar, leaving the lid area blank so ribbon could be tied around the "neck" of the jar.  I used white permanent 651 vinyl I already had on hand, and cut the letter with my Cricut Explore Air 2 machine.  Then, I weeded out the excess vin

Tissue Paper Art

Image
Before the stay-at-home order was issued for us, I had purchased supplies for many projects.  Said supplies were stashed in various locations of the house, waiting to be used.  My intention was to get to the project soon.  Well, months passed, and the bag of supplies stayed in the corner in the closet, the canvases stayed on the shelf and the foam paintbrushes in the garage.   This stay-at-home mandate has afforded me the time to get to those projects we had not yet finished.  We have been doing lots of artwork during this "quarantine".  It has been something that has kept us entertained.  And, who doesn't love personal art on their walls?  This particular project was perfect for the Little Mister. I had been wanting to try out an idea I had for tissue paper art.  The idea was to use a large circular paper puncher to cut circles of tissue paper, then adhere the paper to a canvas.  Well, that didn't quite work out, which you'll see, but we were still able to comple

COVID-19 Chronicles 2020: The Lessons

Image
In early 2020, COVID-19 came in and completely disrupted our lives. Some people lost loved ones, some people lost jobs, the kids lost experiences and special moments, so much about our daily lives changed. This is surreal.  This whole experience has made me consider a lot of things of which I had been taking for granted. Before this virus crept into our lives, I had been praying for a slower pace of life. I was tired of the day-to-day grind. Every morning I woke up tired, we struggle to get our kids dressed and ourselves out the door. We rushed to school and work, then rushed some more after work to get to activities. No matter how hard I tried every night and every weekend to organize us in such a way that would set us up for a week of success, we were still struggling. Looking back, most of the days were a fog. In the past, we had talked about solutions to our problem of being overloaded. We had discussed if it was important to have a two income household, but neither of u

Testing the Revlon One Step Dryer and Volumizer

Image
I recorded this video last year. Initially, I was just going to scrap it. However, given these current pandemic times and our need for social distancing, I decided to edit and post it. I recorded my first impression and subsequent review of how the Revlon One Step Dryer and Volumizer worked on my curly natural hair. When I first saw this little dryer, I thought, "If this thing works, this could really save me some time".  I quickly searched the internet to watch people test it out.  But, I didn't see many results for people with my texture hair.  And, I was curious to find out if it could blow dry my hair from a wet state and give me a wearable blowout. I decided to purchase it myself and see if this thing worked.  Even if it didn't work to give me a style I could walk out of the door with, it would at least make drying my hair more comfortable.  I used to use a blow dryer with a comb attachment to dry my hair, then I would flat iron my hair in small sections. 

Basketball Themed Cake

Image
The Little Mister requested a basketball cake for his first birthday cake.  That's right, because of this whole COVID-19 thing, he's getting two cakes this year.  One I made for his actual birthday last week, the other I will make when he gets to have his birthday party. Since I had a bit more time while working on the cake, I decided to film the process.  This cake was a chocolate cake, with French vanilla buttercream icing.  The basketballs where made out of fondant and the details were drawn on with an edible marker.  Hope you enjoy the video!

COVID-19 Chronicles 2020: Everything Has Gotten REAL

Image
When COVID-19 hit Louisiana, it spread like a wildfire.  It seemed as if overnight, cases were doubling.  In an attempt to "flatten the curve" and not completely overwhelm our healthcare system, we have been ordered to "stay in place" until April 12th.  All non-essential businesses have been closed, restaurants are operating on a take out or delivery only basis, schools are closed, most businesses have ordered employees to work from home.  We have been asked to grocery shop on a weekly basis only.  We are creating a whole new normal here, even if it is temporary. I'll be honest, when the Governor announced the closing of schools for weeks, that was the first moment a real sense of fear washed over me.  I had been feeling pretty safe all along, knowing that I was personally trying to minimize outings and watching for signs of illness in those around me.  But seeing the schools close for several weeks, made me realized this thing was spreading so fast that th

Buttercream Donut Cake

Image
I actually did this cake several months ago.  It ended up being one of the cutest and most fun cakes I've ever done.  It was for a sweet three year old girl who loves donuts. My goal was to make it look like a real donut...but be cake, of course.  I prefer to use all buttercream.  It just tastes better and is more forgiving to work with, in my opinion. The video below is a sped up version of how the cake was iced.  I started with two round ten inch cakes.  I cut a trench in the bottom layer and piped icing into it.  Then, stacked the other layer on top of it.  You'll notice a little crack in the top layer, but I fixed it when I started icing the cake. I manipulated the layers so much that it split. Next, I trimmed the cake into the shape of a donut, rounding off the top and bottom of the cake.  Two colors of icing were used, a light brown color for the donut and a pink to simulate the donut icing.  I also topped it off with real sprinkles for a finishing touch.